How To Install Tmux on Linux
Follow this tutorial to install Tmux on Linux in Ubuntu.
$ sudo apt install tmux
Now type tmux and it should open the Tmux interface.
If instead you get this [exited]
Open your tmux configuration (see below about Configuring Tmux):
$ vim ~/.tmux.conf
If you have this line. Then either remove it or comment it for future reference.
set-option -g default-command "reattach-to-user-namespace -l $SHELL"
To learn more about Tmux get the book “Tmux Productive Mouse Free Development”.
Configuring Tmux
Tmux has the config file .tmux.conf. If after installing is not in your home directory. Then create this file.
The following configuration is from the Tmux book mentioned above:
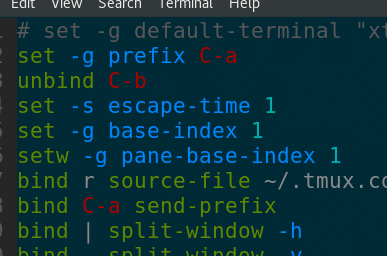
set -g default-terminal "xterm"
set -g prefix C-a
unbind C-b
set -s escape-time 1
set -g base-index 1
setw -g pane-base-index 1
bind r source-file ~/.tmux.conf \; display "Reloaded!"
bind C-a send-prefix
bind | split-window -h
bind - split-window -v
bind h select-pane -L
bind j select-pane -D
bind k select-pane -U
bind l select-pane -R
bind -r C-h select-window -t :-
bind -r C-l select-window -t :+
bind -r H resize-pane -L 5
bind -r J resize-pane -D 5
bind -r K resize-pane -U 5
bind -r L resize-pane -R 6
set -g default-terminal "screen-256color"
set-option -g status-bg colour235 #base02
set-option -g status-fg colour136 #yellow
set-option -g status-attr default
set-window-option -g window-status-fg colour244 #base0
set-window-option -g window-status-bg default
set-window-option -g window-status-current-fg colour166 #orange
set-window-option -g window-status-current-bg default
set-option -g pane-border-fg colour235 #base02
set-option -g pane-active-border-fg colour240 #base01
set-option -g message-bg colour235 #base02
set-option -g message-fg colour166 #orange
set-option -g display-panes-active-colour colour33 #blue
set-option -g display-panes-colour colour166 #orange
set-window-option -g clock-mode-colour colour64 #green
set -g status-left-length 40
set -g status-left "#[fg=green]SomeNameHere: #S #[fg=yellow]#I #[fg=cyan]#P"
set -g status-right "#[fg=cyan]%d %b %R"
set -g status-justify centre
set -g monitor-activity on
set -g visual-activity on
setw -g mode-keys vi
Remap the Caps Lock with Ctrl
Since Tmux uses shortcuts to navigate different panes and windows. You need to remap your Caps Lock key so that it behaves as a Ctrl key…you don’t have to but it’s easier to attach and detach tmux sessions using Caps Lock + a. Than doing Ctrl + a.
$ setxkbmap -option caps:ctrl_modifier
To change back to the original settings:
$ setxkbmap -option
A stuck Caps Lock might happen when you remap the caps lock when it was enabled. To solve this, change back to the original settings and remap when the caps lock is not enabled.
Install Tmuxinator to manage Tmux sessions
Tmuxinator requires Ruby, this command will install it, but if you already have Ruby, then install using gems. Although using gem install tmuxinator I have seen errors when trying to run Tmuxinator that it doesn’t find the executable files.
$ sudo apt install tmuxinator
The output is:
The following NEW packages will be installed:
fonts-lato javascript-common libjs-jquery libruby3.0 rake ruby ruby-erubis ruby-net-telnet ruby-rubygems ruby-thor ruby-webrick ruby-xdg ruby-xmlrpc ruby3.0 rubygems-integration
tmuxinator
Open a configuration file for a Tmuxinator session
$ tmuxinator open awesome-project
Edit the settings as you want or go here to learn more about configuring Tmuxinator.
Example of a tmuxinator configuration
# ~/.config/tmuxinator/tom.yml

name: tom

windows:
  - shell:
      layout: main-vertical
      panes:
        - cd ~/
  - blog:
      layout: main-vertical
      panes:
        - cd /home/blog/ && rvm gemset use blog --default
  - dev:
      layout: main-vertical
      panes:
        - cd /home/dev/ && vim .
        - cd /home/dev/ && mysql -u homer -p awesome-database
        - cd /home/dev/ && nodemon server.js
This section of the configuration splits the window in half vertically, then the right side splits in half horizontally:
- dev:
      layout: main-vertical
      panes:
        - cd /home/dev/ && vim .
        - cd /home/dev/ && mysql -u homer -p awesome-database
        - cd /home/dev/ && nodemon server.js
Here is how it looks:

In this example my tmuxinator file is called tom and I start the session like this:
$ tmuxinator tom
To dettach from the session use the remapped key shortcut CapsLock+a then d.
To stop the session and update the configuration:
$ tmuxinator stop tom
$ tmuxinator open tom
Tmuxinator config files are stored in /home/your-user/.config/tmuxinator/.
To get a list of all tmuxinator sessions do:
$ tmuxinator list
Get the book Tmux Productive Mouse Free Development to understand in more detail how Tmux works. More details here