The Top 5 Python Scripts for Sourcing
These are my top 5 Python scripts I use for researching and sourcing data.
0. Virtualenv
Before installing any script I recommend setting up a virtual environment for each project.
virtualenv is a tool to create isolated Python environments. You can get all the details here.
To install virtualenv do:
$ pip install virtualenv
Test the installation:
$ virtualenv --version
Find the directory for your python version. On Linux this is my output:
$ which python3
/usr/bin/python3

$ which python
/usr/bin/python
Go to the script directory. For example:
$ cd awesome-directory/
Install virtualenv with the python version recommended for that script.
For example for python3:
$ virtualenv -p /usr/bin/python3 env
For python2.7:
$ virtualenv -p /usr/bin/python env
This will create a virtual environment with the selected python version and create a directory called env.
To activate the environment do:
$ source env/bin/activate
This will change the prompt to this:
(env) $
To exit virtualenv:
(env) $ deactivate
It will change the prompt back to just $.
1a. ResumeParser with Anaconda
ResumeParser is an awesome Python scripts to convert PDF resumes to a CSV file.
The first step is to install Anaconda.
Go to Anaconda for Linux and download the 64 bit x86 file for Python3.
The file is about 500MB. It might take around 5 minutes to download.
Let’s say you downloaded the file to ~/Downloads
Open the terminal and verify data integrity. Use the name of the file you downloaded, in this case I am calling it anaconda.sh:
$ sha256sum ~/Downloads/anaconda.sh
This will produce a string that you need to match with the corresponding hash string here.
Then install:
$ bash ~/Downloads/anaconda.sh
If prompted about the license agreement. Hit “Enter” to scroll down until you see a prompt where you have to enter “Yes”.
Choose the default installation.
Prepend install location to PATH. “Yes”.
When completed. Enter the command:
$ source ~/.bashrc
Test that it was installed:
$ anaconda-navigator
If the Navigator opens then it’s installed correctly. To learn more about the Anaconda Navigator go here.
Git clone ResumeParser:
$ git clone https://github.com/bjherger/ResumeParser.git
This will create a directory ResumeParser.
$ cd ResumeParser
This one follows a different way to configure the virtual environment, because many of the required packages are handled by Anaconda:
$ conda env create -f environment.yml
If this command stops with errors. I recommend to follow the next headline “ResumeParser Legacy”
Then activate the environment:
$ source activate resume
Now the magic potion is ready.
Add resumes to this input directory. Although this directory comes with some defaults for PDF files for testing purposes. You can remove them:
data/input/example_resumes
To run the code do:
$ cd bin/
$ python main.py
Open the CSV file in this directory:
$ open data/output/resume_summary.csv
I recommend that you customize the data that you want extracted to your own needs.
1b. ResumeParser Legacy
There is another way to install ResumeParser but the “legacy” source files are not found on the author’s Github project anymore.
Follow the same process to download the project.
If you are on Ubuntu and you haven’t installed git:
$ sudo apt install git
Git clone ResumeParser:
$ git clone https://github.com/bjherger/ResumeParser.git
This will create a directory ResumeParser.
$ cd ResumeParser
Create the virtual environment:
$ virtualenv -p /usr/bin/python env
To activate the environment do:
$ source env/bin/activate
Create a file called requirements.txt and add this content:
html2text==2016.9.19
numpy==1.11.2
pandas==0.19.0
pdfminer==20140328
python-dateutil==2.5.3
pytz==2016.7
six==1.10.0
Clone the file ResumeChecker.py from here:
(env) $ git clone https://gist.github.com/bb222f8b39f246d9add0644192e274e1.git
This will create a directory called bb222f8b39f246d9add0644192e274e1 and inside there is a file called ResumeChecker.py.
You need to move this file into the bin directory.
(env) $ mv bb222f8b39f246d9add0644192e274e1/ResumeChecker.py bin/
Install the dependencies:
(env) $ pip install -r requirements.txt
Now the magic potion is ready.
Add resumes to this input directory. Although this directory comes with some defaults for PDF files for testing purposes. You can remove them:
data/input/example_resumes
To run the code do:
$ cd bin/
$ python ResumeChecker.py --data_path ../data/input/example_resumes --output_path ../data/output/resume_summary.csv
Open the CSV file in this directory:
$ open data/output/resume_summary.csv
Customize the code for your needs, extracting specific content that you want.
For instance I like to create an attribute dashboard.
The process is to add columns on the CSV for the keywords you want to extract. The script will count the number of times this keyword appears on the PDF.
Name         Java   Machine Learning     AWS
Elon Musk      2          10              3
Homer Simpson  1           2              1
Create a list of the keywords that you want to add. This can be any number of keywords.
Add those keywords as columns on the CSV file here:
data/output/resume_summary.csv
Open the file ResumeChecker.py.
Towards the bottom of the file there is code that looks like this:
resume_summary_df["file_path"] = file_list
Find the rows that start with:
resume_summary_df
Scroll down a little bit more and find a section that starts with:
Scrape skill information
Follow the format to add the keywords you want. Adding rows with the exact keywords you added on your CSV.
For example, if you added Machine Learning. Then you could add a row like this:
resume_summary_df["ml_count"] = resume_summary_df["raw_text"].apply(functools.partial(term_count, term=r"machine learning"))
Once you make all the changes, test the script with a small batch of PDFs. Perhaps up 10 files. Then look at the output CSV to see the results.
When you are done using the script. You can deactivate the virtual environment like this:
(env) $ deactivate
2. Subbrute
Subbrute is a “DNS meta-query spider that enumerates DNS records and subdomains”.
Let’s install it and then I will follow with an example:
$ git clone https://github.com/TheRook/subbrute.git
$ cd subbrute
Create the virtual environment:
$ virtualenv -p /usr/bin/python env
To activate the environment do:
$ source env/bin/activate
Run this example to see what you get:
(env) $ ./subbrute.py google.com --type CNAME
If I run this I get this output:
google.com
www.google.com
alt1.aspmx.l.google.com
alt4.aspmx.l.google.com
_spf.google.com
It keeps on running giving more results. You can stop it using Ctrl+C.
When you are done using the script. You can deactivate the virtual environment like this:
(env) $ deactivate
3. Googler
Googler is a Python script…“Google Search, Google Site Search, Google News from the terminal”
$ git clone https://github.com/jarun/googler.git
$ cd googler
Create the virtual environment:
$ virtualenv -p /usr/bin/python env
To activate the environment do:
$ source env/bin/activate
Run a search:
(env) $ ./googler --count 3 --exact fender
It will produce these results:
*1 Fender Guitars | Electric, Acoustic & Bass Guitars, Amps, Pro Audio*
*https://www.fender.com/*
*Since 1946, Fender's iconic Stratocasters, Telecasters and Precision & Jazz bass guitars have transformed nearly every music genre.*

*2 Fender (@Fender) · Twitter*
*https://twitter.com/Fender?ref_src=twsrc%5Egoogle%7Ctwcamp%5Eserp%7Ctwgr%5Eauthor*

*3 Fender Musical Instruments Corporation - Wikipedia*
*https://en.wikipedia.org/wiki/Fender_Musical_Instruments_Corporation*
*Coordinates: 33°38′46″N 111°53′57″W / 33.6460322°N 111.899058°W / 33.6460322; -111.899058. Fender Musical Instruments Corporation (FMIC), ...*
The bottom of the screen will show:
googler (? for help)
Type ?
It will show help options:
omniprompt keys:
- n, p fetch the next or previous set of search results
- index open the result corresponding to index in browser
- f jump to the first page
- o open the current search in browser
- g keywords initiate a new Google search for ‘keywords’ with original options
- q, ^D, double Enter exit googler
- ? show omniprompt help
- * any other string initiates a new search with original options
Type:
site:github.com python
It will show 3 results from Github.
Type:
filetype:pdf python
It will show 3 PDF results.
Hit the Enter key twice to exit.
When you are done using the script. You can deactivate the virtual environment like this:
(env) $ deactivate
4. Parsero
Parsero is a Python script that reads Robots.txt and looks for disallow entries.
$ git clone https://github.com/behindthefirewalls/Parsero.git
$ cd Parsero
Create the virtual environment:
$ virtualenv -p /usr/bin/python env
To activate the environment do:
$ source env/bin/activate
Setup the script:
(env) $ sudo setup.py install
Open the help options:
(env) $ parsero -h
usage: parsero.py [-h] [-u URL] [-o] [-sb]
optional arguments:
- -h, –help show this help message and exit
- -u URL Type the URL which will be analyzed
- -o Show only the “HTTP 200” status code
- -sb Search in Bing indexed Disallows
- -f FILE Scan a list of domains from a list
Run an example:
(env) $ parsero -u google.com
When you are done using the script. You can deactivate the virtual environment like this:
(env) $ deactivate
5. The Harvester
The Harvester is a Python script used to gather data from public sources.
$ git clone https://github.com/laramies/theHarvester.git
$ cd theHarvester
Create the virtual environment:
$ virtualenv -p /usr/bin/python env
To activate the environment do:
$ source env/bin/activate
Set execute permission for the script:
(env) $ chmod +x theHarvester.py
Install dependencies:
(env) $ pip install requests
Run with:
(env) $ ./theHarvester.py
This will show the help page and how to use it.
Here is an example:
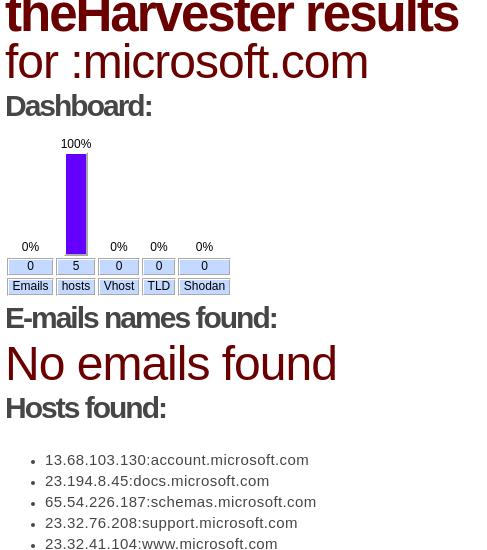
(env) $ ./theHarvester.py -d microsoft.com -l 50 -b google -f example1
This will search for data on that website. Find 50 results using google and save the results to an html file called example1.
If you open the file example1 in your browser, it looks like this:
When you are done using the script. You can deactivate the virtual environment like this:
(env) $ deactivate