How to Install Sphinx and ReadTheDocs
How to install Sphinx and deploy to ReadTheDocs. Sphinx is used to write technical documentation, books or a structured document.
In a previous article I wrote about moving from Markdown to Sphinx reStructuredText.
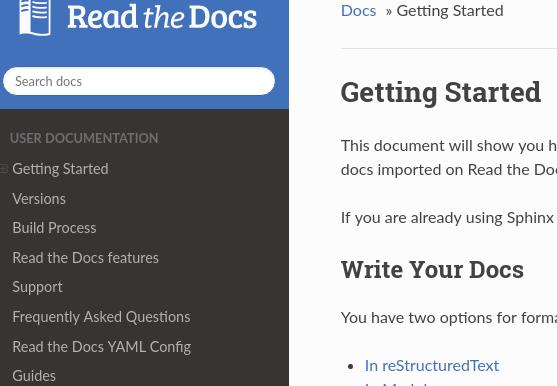
Go to Readthedocs to see a preview of what I wanted to achieve. It has a table of contents on the sidebar and the content on the right. It’s also mobile friendly.
This blog uses Markdown but I have been looking to use something else to keep my diary of my studying. I have been taking online classes for the last year and I take notes using Markdown. I started school this semester and wanted to be more organized and have a way to deploy my notes somewhere.
I followed this video to learn how to install Sphinx. Which is used to write Python documentation. But you can use it to write any type of technical documentation.
The output formats for Sphinx are:
- HTML
- LaTeX (for printable PDF)
- ePub
The official Sphinx site has more details here.
How to Install Sphinx
Create a github repo for your project.
The repo won’t have any code. You can use the README file as a placeholder and will just have a link to the readthedocs site.
I like to create an outer directory called docs-repo that contains these:
docsdirectoryenvREADME.md.gitignore
Create the outer directory:
$ mkdir docs-repo
$ cd docs-repo
Create a docs directory:
$ mkdir docs
Create and activate a virtual environment
$ virtualenv -p /usr/bin/python3 env
$ source env/bin/activate
Create a .gitignore and add:
env/
Initialize:
$ git init
$ git remote add origin your-awesome-repo.git
Install Sphinx:
$ pwd
../docs-repo/

$ pip install sphinx sphinx-autobuild
Go inside docs and start sphinx:
$ cd docs
$ sphinx-quickstart
This will start the config file and it will ask some questions.
The first question was related to selecting the root path.
Because I was already inside the docs directory. The first option was set to selected root path: ..
Then I selected these options:
- Separate source and build directories:
y - Name prefix for templates and static dir:
n - Project name:
(enter the project name you want) - Author name:
(your name) - Project release:
(up to you) - Project language[en]:
(hit enter for default) - Source file suffix [.rst]:
(hit enter for default) - Name your master document (without suffix) [index]:
(hit enter for default) - Do you want to use the epub builder:
n - autodoc: automatically insert docstrings from modules:
y
For the rest I hit enter for the defaults.
Then these:
- Create Makefile:
y - Create windows command file:
n
Files Created
After the questions it created these files:
./source/conf.py
./source/index.rst
./Makefile
List the directories:
$ ls

build Makefile source
Open the conf.py file:
$ vim source/conf.py
This file shows all the options we configured.
Build the Documentation
$ make html
Running Sphinx v1.7.7 making output directory… loading pickled environment… not yet created building [mo]: targets for 0 po files that are out of date building [html]: targets for 1 source files that are out of date updating environment: 1 added, 0 changed, 0 removed reading sources… [100%] index looking for now-outdated files… none found pickling environment… done checking consistency… done preparing documents… done writing output… [100%] index generating indices… genindex writing additional pages… search copying static files… done copying extra files… done dumping search index in English (code: en) … done dumping object inventory… done build succeeded.
index.html
$ ls build/html/

index.html
Open this file to review on the browser. I am on Linux. If you are on something else. Use your specific command or just browse to the file and open it.
$ xdg-open build/html/index.html
index.rst
$ ls source/

index.rst
Open this file to review:
$ vim source/index.rst
Make changes, then build again:
$ make html
Reload browser.
Here is the source code of index.rst for readthedocs.
I built my own index.rst based on this file. See my file at the end.
Github
Push to Github
$ pwd
../docs-repo/docs/

$ cd ..
$ ls

docs env README.md

$ git add .
$ git commit -m "first commit for docs"
$ git push -u origin master
Deploy Sphinx to Readthedocs
Go to your Readthedocs dashboard and go to “Import a Project”.
- If you are not connected to Github it will ask to do so.
- When you refresh, it will show a list of your repos.
- Select the repo.
- Edit Project Details.
- It should take some moment to build the docs.
You can also set your repo and your readthedocs to private.
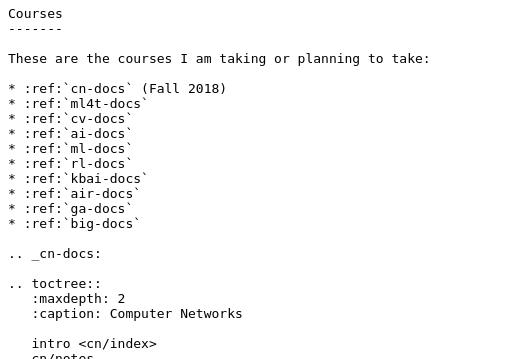
My index.rst file
It took me a while to get this right. I wanted to have this structure:
Course Name
- intro
- Notes
- Book
- Udacity
- Reading
- Research
- Software
Course Name
- same
- …
If you are not familiar with reStructuredText there are a lot of resources online. But here are a few tips:
Adding Links
The format I am following is adding a link on the paragraph and adding the reference right after the paragraph. Readthedocs follows the same process.
More `about me`_ and `my blog`_. Blabla
more blabla.

.. _about me: https://the-url-here
.. _my blog: https://another-url-here
For my index I wanted the list of courses in bullet points and have this built into my sidebar Table of Contents.
- Course 1
- Course 2
- …
Follow this syntax to build bullet points:
:ref:`Course 1`
:ref:`Course 1`
Follow this syntax to build the Table of Contents:
.. _Course 1:

.. toctree::
   :maxdepth: 2
   :caption: Course 1

   intro <course1/index>
   course1/notes
   course1/book/index
   course1/udacity
   course1/reading
   course1/research
   course1/software
The code follows the same tabbed whitespace as writing in Python.
To be more organized I wanted each Course in its own directory. That’s why you see this course1/notes.
The Table of Contents is built with the first headline found under course1/notes. In the case of that syntax.
For course1/book/index. It takes the first headline inside that index file. This one has a subdirectory for book to organize it into chapters.
For intro <course1/index>. intro is used as the name element in the table of contents.
To test if you built your index.rst file correctly. Just run:
$ make html
It will read the index.rst file in your root path and it will show errors in the output. Then open the build/html/index.html file to preview.
Troubleshooting
Menu options showing statics instead of caption names
When you add the toctree to your index.rst. Such as:
.. toctree:
:maxdepth: 2
:caption: Course 1

intro <course1/index>
course1/notes
It seems to have a glitch when you click on a menu option. It will show the name of the file instead of the caption.
In this example:
intro <course1/index>
It should have the URL pointing to course1/index.rst with the caption intro.
I saw that upon initial configuration and creating the root index.rst. The menu options show up with the right caption. But when clicking on an option on the menu. The caption names would change to the file name.
This is pretty confusing in case you have secondary indices:
Course1
  subindex1
  subindex2
Course2
  subindex1
  subindex2
I don’t have a clear resolution for this but what I did was making sure that each subindex had:
A title
=======

A text. Followed by other types of text

* such as bullet point
I initially had this:
A title
=======

* Bullet points
I added a text before the bullet points then make html. Then it displayed the correct captions for the URL
make html
When you run this command, it might show errors. Just read the output to correct those errors and then run again.