Android App in Linux with Java
Building an Android app in Linux with Java.
Related posts:
Install Android Studio on Linux
Follow the official docs to install Android here and scroll down to Linux.
The steps are:
- Unpack the install zip file to
/usr/local - If using 64-bit, then install the required libraries
- Run the installation script
- Follow the setup wizard
More details…
Unpack the install zip file to /usr/local
Downloaded the tar file.
$ cd Downloads
$ tar -xvf thefile.tar
Unpack in Downloads and move to /usr/local
$ sudo mv ~/Downloads/android-studio/ /usr/local/
If using 64-bit then install the required libraries
Follow the official docs, depending on your distro.
If running on 64-bit Fedora:
$ sudo dnf install zlib.i686 ncurses-libs.i686 bzip2-libs.i686
Output:
Installing:
 zlib    i686  1.2.11-18.fc30    updates  94 k
 bzip2-libs  i686  1.0.6-29.fc30  fedora  38 k
 ncurses-libs  i686  6.1-10.20180923.fc30  fedora  308 k
Upgrading:
 glibc   x86_64  2.29-22.fc30  updates  4.0 M
 glibc-all-langpacks  x86_64  2.29-22.fc30  updates  25 M
 glibc-common  x86_64  2.29-22.fc30  updates  838 k
 glibc-devel    x86_64  2.29-22.fc30  updates  1.0 M
 glibc-headers  x86_64  2.29-22.fc30  updates  473 k
 glibc-langpack-en  x86_64  2.29-22.fc30  updates  818 k
 libgcc  x86_64  9.2.1-1.fc30  updates  91 k
Installing dependencies:
 glibc   i686  2.29-22.fc30  updates  3.9 M
 libgcc  i686  9.2.1-1.fc30  updates  98 k
Run the installation script
Run the installation script
$ cd /usr/local/android-studio/bin/
$ ./studio.sh
Initial settings:
- Import Android Studio Settings:
Do not import settings - Data Sharing:
Don't send
Follow the setup wizard
It starts the Setup Wizard:
- Standard
- Select UI theme: Darcula
Current Settings output:
Setup Type: Standard
SDK Folder: /home/tom/Android/Sdk
Total Download Size: 515 MB
SDK Components to Download:

Android Emulator: 205 MB
Android SDK Build-Tools 29.0.2: 39.7 MB
Android SDK Platform 29: 74.6 MB
Android SDK Platform-Tools: 8.33 MB
Android SDK Tools: 147 MB
SDK Patch Applier v4: 1.74 MB
Sources for Android 29: 37.6 MB
Emulator Settings said:
We have detected that your system can run the Android emulator in an accelerated performance mode...Linux-based systems support virtual machine acceleration through the KVM software package.
Configure Hardware Acceleration
Configured hardware acceleration following this Bytefreaks blog post. More here
Verify that you get an output, which means your CPU supports virtualization:
$ egrep '^flags.*(vmx|svm)' /proc/cpuinfo
Install virtualization packages:
$ sudo dnf group install --with-optional virtualization
The output is:
Installing group/module packages:
 guestfs-browser  x86_64  0.2.3-15.fc30  fedora   1.6 M
 libguestfs-tools    noarch  1:1.40.2-4.fc30  fedora    33 k
 python3-libguestfs  x86_64  1:1.40.2-4.fc30  fedora   211 k
 virt-install  noarch  2.1.0-2.fc30   fedora    64 k
 virt-manager  noarch  2.1.0-2.fc30   fedora   582 k
 virt-top    x86_64  1.0.8-34.fc30  fedora   717 k
 virt-viewer   x86_64  8.0-1.fc30  fedora   390 k
Installing dependencies:
 gnutls-dane   x86_64  3.6.8-1.fc30   updates   25 k
 gnutls-utils  x86_64  3.6.8-1.fc30   updates  299 k
 libvirt-bash-completion  x86_64  5.1.0-9.fc30   updates   12 k
 libvirt-client   x86_64  5.1.0-9.fc30   updates  310 k
 python3-libvirt  x86_64  5.1.0-2.fc30   updates  288 k
 hexedit  x86_64  1.2.13-15.fc30   fedora    39 k
 hivex    x86_64  1.3.18-4.fc30  fedora    98 k
 libguestfs  x86_64  1:1.40.2-4.fc30  fedora   2.7 M
 libguestfs-tools-c  x86_64  1:1.40.2-4.fc30  fedora   5.5 M
 libldm   x86_64  0.2.4-4.fc30   fedora    53 k
 lsscsi   x86_64  0.30-2.fc30    fedora    63 k
 ocaml-camomile-data   x86_64  0.8.7-5.fc30   fedora   2.1 M
 perl-Sys-Guestfs    x86_64  1:1.40.2-4.fc30  fedora   316 k
 perl-Sys-Virt    x86_64  5.1.0-1.fc30   fedora   289 k
 perl-hivex  x86_64  1.3.18-4.fc30  fedora    50 k
 python3-argcomplete   noarch  1.9.5-1.fc30   fedora    57 k
 scrub    x86_64  2.5.2-14.fc30  fedora    42 k
 supermin    x86_64  5.1.20-3.fc30  fedora   446 k
 virt-manager-common   noarch  2.1.0-2.fc30   fedora   1.1 M
 zerofree    x86_64  1.1.1-3.fc30   fedora    27 k
Installing weak dependencies:
 libguestfs-xfs   x86_64  1:1.40.2-4.fc30  fedora    15 k
Installing Groups:
 Virtualization
Start the service and verify kvm modules are loaded:
$ sudo systemctl start libvirtd
$ sudo systemctl enable libvirtd
$ lsmod | grep kvm
Output is:
kvm_intel  303104  0
kvm  741376  1 kvm_intel
irqbypass  16384  1 kvm
After all this for some reason my switch-windows shortcut alt+tab stopped working. So I ran this:
$ killall nautilus
Android Studio != IntelliJ IDEA
Sometimes, when I am not completely awake, I mistake Android Studio with IntelliJ IDEA, and spend a while trying to see why my project doesn’t load correctly.
Quick reminder. Look at the top left of the IDE and read that it says:
Android Studio
Setup the Android Emulator
Launch Android Studio:
- Tools > AVD Manager
- It opens
Your Virtual Devices - Create Virtual Device
- Select hardware:
Pixel 4 XLand click Next - System image:
API level 28(ClickDownloadabout 1GB) and Next - AVD Name shows:
Pixel 4 XL API 28 - Graphics:
Hardware - Advanced Settings..
- RAM: 1024
- SD Card: 10
- Finish
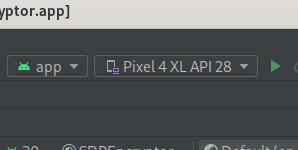
Run the Emulator
Android Studio. Top right options.
Click on Play to run the app.
The first time I ran the app. It took about 20 minutes to load. That’s right. 20 minutes. My computer might not have the proper hardware specs to run the emulator.
The bottom menu Run tab shows output:
06/11 17:23:50: Launching 'app' on Pixel 4 XL API 28.
App restart successful without requiring a re-install.
Close the Emulator
Close the app to start from scratch next time you start it. Use the square icon at the bottom. Then swipe the app to the right to clear. Click on Clear All if the option shows.

Then close the emulator window. Don’t power off.
More about stopping the emulator in the official docs here
- Run an emulator from the play button or from AVD (Menu:
Tools/AVD Manager) - Or Run the app from Android Studio play button.
- Stop an emulator from AVD, find the device, use drop down and
Stop - To clear the data, using the same drop down and
Wipe Data. However, I don’t recommend this as next time it will take a long time to start the app.
Run the Emulator faster
Following a question in stackoverflow here to run the emulator faster.
When you run the emulator. Click on the elipses to open Extended Controls
- Then go to Settings
- Top menu tab
Advanced - For
OpenGL ES rendererdrop down toDesktop native OpenGL - Close the Extended Controls window
My computer (Fedora, 8GB RAM) is very slow running the emulator. Very, very slow.
I got a used Nexus phone…
Run the app on a phone
Here is the quick summary with details below:
- In the phone, set
USB Debugging - Connect the phone with a USB cable that is used to transfer data. Not a cable that is used for charging the phone.
- If connected, the phone will say
USB Debugging Connected - Install
adband confirm the device is connected withadb devices - In Android Studio confirm the device shows in the drop down.
- Play to start the app
- Stop to stop the app
In the phone set USB Debugging
As seen in the official docs here. Follow these steps to connect a phone to Android Studio.
Go to the phone and enable USB debugging:
- Settings
- About Phone
- Tap on
Build Number7 times
Go back to settings
- Developer options
- Enable
USB debugging
Connect the phone with a USB cable that can transfer data.
Connect the phone with a USB cable that can transfer data. Not a cable that is only used for power.
This is where I spent a few hours troubleshooting. I used a USB cable. It started to charge the phone but wouldn’t recognize it.
Connect the phone with a USB directly to the computer
I use a 4-port USB hub to connect my hardware. When connecting my device to this hub, it causes some weird intermittent connection. Connect the phone with a USB data cable directly to the computer.
USB Debugging Connected
Once the phone is connected to USB. The screen will say USB Debugging Connected. This might not show up every time you connect it.
Install ADB “Android Debug Bridge”
Install Android Tools adb.
For Linux Fedora:
sudo dnf install adb
Output
Installing: android-tools
Version: 20180828gitc7815d675-8.fc33
Total download size: 482 k
Installed size: 1.6 M
Start the adb server:
adb start-server
Show adb devices
$ adb devices
List of devices attached
adb server version (41) doesn't match this client (40); killing
Fix: adb server version doesn’t match this client
Fix the error adb server version doesn't match this client as shown in stackoverflow here.
adb kill-server
sudo cp ~/Android/Sdk/platform-tools/adb /usr/bin/adb
sudo chmod +x /usr/bin/adb
adb start-server
Run adb again:
adb devices
List of devices attached
06c6d5       device
For more troubleshooting see stackexchange here.
In Android Studio confirm that the device shows up
In Android Studio, top right tools. Confirm the device shows up.
The application could not be installed: INSTALL_FAILED_OLDER_SDK
My app setup has a mismatch.
My build.gradle had this:
defaultConfig {
        applicationId "edu.gatech.seclass.sdpencryptor"
        minSdkVersion 28
        targetSdkVersion 30
        versionCode 1
        versionName "1.0"

        testInstrumentationRunner "androidx.test.runner.AndroidJUnitRunner"
    }
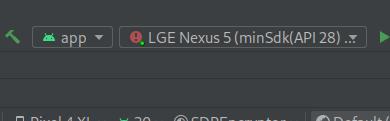
The device drop down showed:
LGE Nexus 5 (minSDK(API28) > API(23))
After trying to run the app. It showed these errors
The application could not be installed: INSTALL_FAILED_OLDER_SDK

The application's minSdkVersion is newer than the device API level.
The old phone I acquired, LGE Nexus 5, was on API 23. This is a hack to match the API on the phone with Android Studio. However, as later explained, it is better to upgrade the API on the phone. The hack was to modified build.gradle to show:
minSdkVersion 23
Complete code should be:
defaultConfig {
        applicationId "edu.gatech.seclass.sdpencryptor"
        minSdkVersion 23
        targetSdkVersion 30
        versionCode 1
        versionName "1.0"

        testInstrumentationRunner "androidx.test.runner.AndroidJUnitRunner"
    }
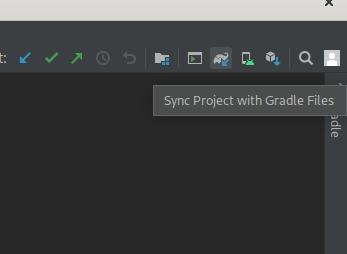
When you change build.gradle a message on top might say Gradle files have changed since last project sync. Click on Sync Now.
If this message doesn’t appear. Try the icon on the top that looks like an elephant with an arrow. I call it the elephant icon
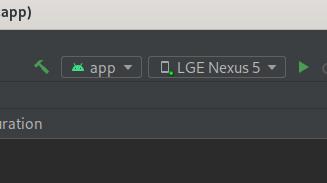
Now the drop down shows this phone LGE Nexus 5 with no warning.
Failed to install the following Android SDK packages as some licences have not been accepted.
When running the app and the following error shows up:
Failed to install the following Android SDK packages as
some licences have not been accepted.

    build-tools;30.0.2 Android SDK Build-Tools 30.0.2

To build this project, accept the SDK license agreements
and install the missing components using the Android Studio SDK Manager.

Alternatively, to transfer the license agreements from one workstation to another,
see http://d.android.com/r/studio-ui/export-licenses.html

Using Android SDK: /home/tom/Android/Sdk
As seen on Stackoverflow here
Go to Android Studio > Tools > SDK Manager > SDK Tools. Check Android SDK Command-line Tools.
Press Apply.
A window opens SDK Quickfix Installation. Click Accept and Next.
Output:
Packages to install:
- Android SDK Command-line Tools (latest) (cmdline-tools;latest)

Preparing "Install Android SDK Command-line Tools (latest) (revision: 4.0)".
Downloading https://dl.google.com/android/repository/commandlinetools-linux-7302050_latest.zip
"Install Android SDK Command-line Tools (latest) (revision: 4.0)" ready.
Installing Android SDK Command-line Tools (latest) in /home/tom/Android/Sdk/cmdline-tools/latest
"Install Android SDK Command-line Tools (latest) (revision: 4.0)" complete.
"Install Android SDK Command-line Tools (latest) (revision: 4.0)" finished.
Try running the app again. It should build without error.
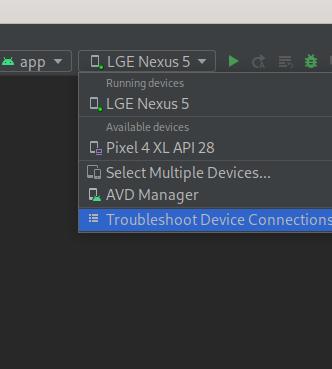
Device is not recognized and cannot launch app
Very strange behavior after unplugging the device to charge the battery. Then plugged again. Ran the app but it said device was not recognized. Even though adb devices showed the device listed.
Go to the devices drop down and choose Troubleshoot Device Connections
I followed these steps:
- Disabled/Enabled USB Debugging
- Restarted the adb server
- Check the app connects with
adb devices - Run the app again.
Try connecting the device directly to the computer and not to a USB hub.
Upgrade Nexus 5 from Android 6 to Android 9
A hack to match the API on the device with the API in Android Studio was to modify the minSdkVersion in build.gradle. A better solution is to upgrade the API on the device. The problem with my device was that it couldn’t be upgrade it using the official process. The device had to be rooted. Follow these steps at your own risk.
As seen on a blog post here
Prerequisites
- Charge phone > 50%
- Backup phone
- Unlock bootloader
- Install TWRP Recovery
- Download Android 9
- Download Pie Gapps
Install
- Move downloads to internal storage (root folder)
- Boot in TWRP Recovery
- Wipe system data on TWRP Recovery
- Flash custom ROM
- Flash Android 9
- Flash Gapps
- Reboot device
Steps in detail…
Backup the phone
Following this blog post.
$ adb devices
$ adb backup all
Android phone shows this:
Full backup
A full backup of all data to a connected desktop
computer has been requested. Do you want to allow
this to happen.

If you did not request the backup yourself, do not
allow the operation to proceed

If you wish to encrypt the full backup data, enter
a password below

Do not backup       Backup my data
Unlock Bootloader
Source: This blog post.
Enable USB Debugging.
$ adb reboot bootloader
Android phone shows this
Start button

FASTBOOT MODE
PRODUCT NAME - hammerhead
more options
...
LOCK STATE - locked
Use the volume keys to cycle through these button options. The power button can be used to select the option
- Start (Start Android normally)
- Restart bootloader
- Recovery mode
- Power off
With Start option on the phone. Type this in the computer shell:
$ sudo fastboot oem unlock
Android shows:
Unlock bootloader?

....
Press the volume up/down buttons
to select Yes or No. Then press the
Power button to continue
A few seconds later it goes back to FASTBOOT MODE
Start button
FASTBOOT MODE
PRODUCT NAME - hammerhead
more options
...
LOCK STATE - unlocked
Type in computer shell:
$ sudo fastboot reboot
It takes a while to start again.
Setup TWRP
Based on this tutorial.
- Download TWRP for your device from the TWRP website here
- Mine was Nexus 5. More here
- Rename the downloaded
imgfile totwrp.img
Since the phone was wiped out. Go to the phone and enable USB debugging:
- Settings
- About Phone
- Tap on Build Number 7 times
Go back to settings
- Developer options
- Enable
USB debugging
Check that the phone connects to the computer
$ adb devices
Then follow these:
$ adb reboot bootloader
$ sudo fastboot flash recovery twrp.img
$ sudo fastboot boot twrp.img
Android phone shows:
Unmodified System Partition

Keep system read only?

TWRP can leave your system partition unmodified
to make it easier for you to take take official updates.
TWRP will be unable to prevent the stock ROM from
replacing TWRP and will not offer to root your device

Installing zips or performing adb operations may still
modify the system partition

Keep Read Only      Select Language

>>> Swipe to Allow Modifications
I swiped.
Now it shows the interface for TWRP Team Win Recovery Project
- Install
- Wipe
- Backup
- Restore
- Mount
- Settings
- Advanced
- Reboot
Install the TWRP app
- Reboot
- Install TWRP App
- Swipe to install TWRP App
- When done it will say
Successful - Reboot system
Backup using TWRP
Based on this tutorial.
Create a directory where you want to save the backup. For example I created a directory with the device model:
$ mkdir nexus5-backup
$ cd nexus5-backup
Verify the connection
$ adb devices
$ adb reboot recovery
On the TWRP app
- Backup
- Select: System, data, boot, EFS
On the terminal
$ adb backup --twrp
The phone says:
Running Recovery Commands

Updating partition details
Full SELinux support is present
MTP Enabled
Updating partition details
* Total number of partitions to backup: 5
* Total size of all data: 1626 MB
* Available space: 12103 MB
BACKUP STARTED
* Backup folder: /data/media/0/TWRP/BACKUPS/<device adb number>/<date>
Backing up System
Backing up Data (excl. storage)
Backups of data do not include any files in internal
storage such as pictures or downloads
When it’s done. It goes back to the TWRP menu.
Check the backup file in the computer:
$ ls -lh
total 1.6G
-rw-r-----. 1 tom 1.6G Jun 29 22:54 backup.ab
To restore:
$ adb restore --twrp
Cannot access Android Internal Storage from laptop
As seen on Reddit here
While messing around with Android internal storage. When opening the mounted folder. It doesn’t show any contents. Also trying to access Android from the terminal shows empty.
- Go to Developer options
- Select USB Configuration
- Change to Charging only
- Select USB Configuration
- Change back to MTP
Now opening the directory using GUI it shows the folder Internal Storage.
From the Terminal. This directory is here:
/run/user/1000/gvfs/mtp\:host\=<device mode><device ID>/Internal\ storage/
Root the device with Magisk
Based on this tutorial.
Magisk docs here
Go to your phone
- Download the stock boot image for your device from Google here
- Unzip this file and find another zip file that looks like this
image-hammerhead-m4b30z.zip - Inside that folder, find a file called
boot.img - Copy paste into
Internal Storage/Download - Download latest Magisk from the repo here
Follow the install process from the repo here
- Install the app
- Open the app
- On Magisk, tap install
- Options, Next
- Method, Select and Patch a file, Let’s go
- Top right elipses, show internal storage
- Left menu, internal storage
- Download
- Tap the file you copy/pasted
Android shows:
Installation
Done!

Device platform: armeabi-v7a
Installing: 23.0
Copying image to cache
Unpacking boot image
Checking ramdisk status
Stock boot image detected
Patching ramdisk
Repacking boot image

Output file is written to
/storage/emulated/0/Download/magisk_patched-23000_K2bQM.img

- All done
Copy the image to your laptop
$ adb pull /storage/emulated/0/Download/magisk_patched-23000_K2bQM.img
$ ls
magisk_patched-23000_K2bQM.img
Flash the patched image to your device
$ adb reboot bootloader
$ sudo fastboot flash boot magisk_patched-23000_K2bQM.img
$ sudo fastboot reboot
Setup Android 9
Download the AOSP Android 9 file and the Gapps file
Move files to Internal Storage
Boot in TWRP Recovery
$ adb reboot recovery
Click Wipe, Format data, type Yes, Swipe, Back button, Advanced Wipe, Select Dalvik, System, Cache, Swipe.
Home, Reboot.
Fixing Bootloop
Here is what happened to me. I follow those instructions on that blog post. I rebooted the device and got stuck on the Google logo. Aka bootloop.
This blog post shows a fix. More there
- Get out of bootlop by starting TWRP in Recovery mode
- Press power and volume down until it shuts down, restarts and it shows the TWRP interface
- Check that MTP is enabled. Go to
MountandEnable MTP - Copy/paste the AOSP Android 9 file into the device
TWRPdirectory - On the device TWRP go to
Installand select the AOSP file
This is what Android shows when installing this file:
Install Zip 1 of 1
aosp_hammerhead-9-20181003.CAF.zip

Updating partition details
..done
Full SELinux support is present.
MTP Enabled
Installing zip file '/sdcard/TWRP/aosp_hammerhead-9-20181003.CAF.zip'
Unmounting system
Warning: No file_contexts
Target: google/hammerhead/hammerhead:6.0.1/M4B30Z/3437181:user/release-keys
#####################
AOSP
www.unlegacy-android.org
#####################
Patching system image unconditionally...
When this is done. Click the button Reboot System
This should launch the phone again with the updated OS version. I was in Android 6 and now it says Android 9.
Install Gapps
Enable USB debugging again:
- Settings > System
- About Phone
- Tap on Build Number 7 times
Developer Options are located here:
- Settings > System
- Advanced
In Developer Options change Default USB configuration
- Change from
No data transfer - To
File Transfer - Now you can open the phone from your computer
Move the Gapps file into phone Internal storage.
- My file was
Partial_GApps_08302018.zip - Moved to phone
Internal shared storage
Boot in TWRP Recovery
$ adb reboot recovery
Then follow:
- Tap Install
- Go to root directory
- Tap on the Gapps file
- Swipe to confirm flash
- Then tap
Reboot system
Create a new Android Studio project
Follow this tutorial on Youtube from a Georgia Tech instructor.
In Android Studio. Go to File > New > New Project. Select Empty Activity.
Choose a Name for the project.
Choose a location to save the project.
Choose as language Java (or Kotlin).
Choose the Minimum API level.
In my current setup with the device Nexus 5 upgraded to Android 9, my API is 28.
Finish and wait for the application to build.
Design the application
Go to the application directory app/res/layout and modify the .xml files to design the application.
The default file is activity_main.xml.
Use the code/split/design interface to design the application.
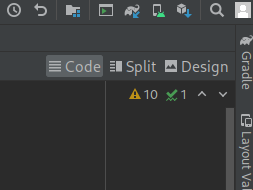
I find it easier to switch between design and code.
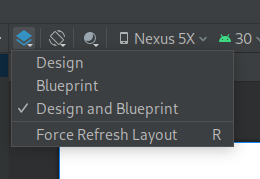
Use the Select design surface to enable/disable the design and blueprint surfaces.
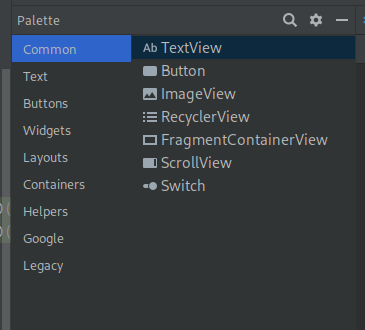
Use the Palette to add containers. This is like HTML. Containers can be vertical or horizontal or a combination.
Create a new layout screen and model in File > New > Activity > Empty Activity. Enter the Activity Name in CamelCase. This will create a Layout Name in snake_case.
Responsive and scrollable design
This layout has a ScrollView that lets you scroll up and down. It has a ConstraintLayout and linearLayout (vertical) that allows it to be responsive. Then other LinearLayout (vertical) to stack components.
The ScrollView is set like this code sample:
<?xml version="1.0" encoding="utf-8"?>
<ScrollView xmlns:android="http://schemas.android.com/apk/res/android"
    xmlns:app="http://schemas.android.com/apk/res-auto"
    xmlns:tools="http://schemas.android.com/tools"
    android:layout_width="match_parent"
    android:layout_height="match_parent"
    android:fillViewport="true"
    tools:context=".MainActivity">

    <androidx.constraintlayout.widget.ConstraintLayout
        android:layout_width="match_parent"
        android:layout_height="wrap_content">

        <LinearLayout
            android:id="@+id/linearLayout"
            android:layout_width="0dp"
            android:layout_height="wrap_content"
            android:layout_marginStart="1dp"
            android:layout_marginTop="1dp"
            android:layout_marginEnd="1dp"
            android:layout_marginBottom="1dp"
            android:orientation="vertical"
            app:layout_constraintBottom_toBottomOf="parent"
            app:layout_constraintEnd_toEndOf="parent"
            app:layout_constraintStart_toStartOf="parent"
            app:layout_constraintTop_toTopOf="parent">
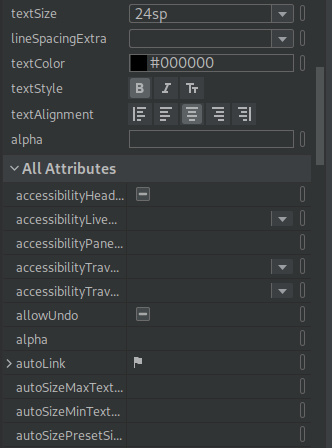
Attributes menu
The attributes of the components can be set with the interface Attributes
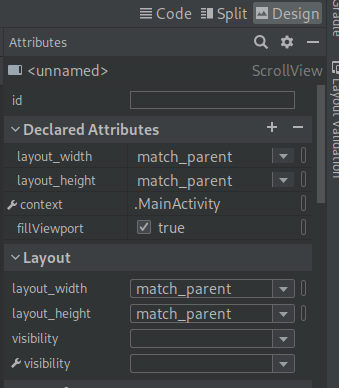
Every component should have a descriptive id and you can use camel case with first letter in lower case. Then use the ids to tie them to the back end.

Make sure to use the correct component. For example. Plain Text is used for titles or labels. While TextView is for the user to enter text.
The attributes menu has a lot of options. The IDE can make a recommendation or warning if you enter something that might not be correct.
If building the app fails with the error Task :app:lint Failed you can use Infer Constraints to fix it.

Connect the design to the back end
The default activity activity_main.xml comes with a MainActivity class.
Here is an example of a design:
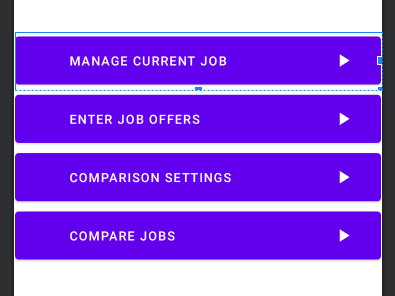
With the following button IDs:
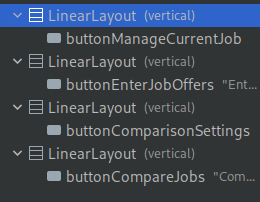
Open MainActivity.
Capturing the user clicking on a button can be managed like in this code sample:
public void handleClick(View view) {
        switch (view.getId()) {
            case R.id.buttonManageCurrentJob:
                Intent intentManageCurrentJob = new Intent(this, CurrentJobActivity.class);
                startActivity(intentManageCurrentJob);
                break;
            case R.id.buttonEnterJobOffers:
                Intent intentEnterJobOffers = new Intent(this, EnterJobOffers.class);
                startActivity(intentEnterJobOffers);
                break;
            ...
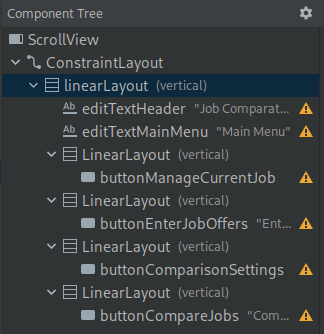
Another example is an interface where the user can enter data and press buttons.
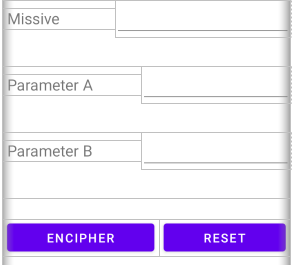
The component ids are shown in the component tree.
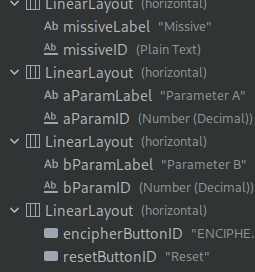
Connect the design to the back end like in this code sample:
public class MainActivity extends AppCompatActivity {

    private Button buttonEncipher;
    private Button buttonReset;
    private EditText textMissive;
    private EditText textParamA;
    private EditText textParamB;
    private TextView textEncryptedMissive;

    @Override
    protected void onCreate(Bundle savedInstanceState) {
        super.onCreate(savedInstanceState);
        setContentView(R.layout.activity_main);

        buttonEncipher = (Button) findViewById(R.id.encipherButtonID);
        buttonReset = (Button) findViewById(R.id.resetButtonID);
        textMissive = (EditText) findViewById(R.id.missiveID);
        textParamA = (EditText) findViewById(R.id.aParamID);
        textParamB = (EditText) findViewById(R.id.bParamID);
        textEncryptedMissive = (TextView) findViewById(R.id.encryptedMissiveID);
    }
The buttons can be connected using case as in this code sample:
public void handleClick(View view) {
        switch (view.getId()) {
            case R.id.encipherButtonID:

            // do something awesome here
The reset button can be programmed to reset the interface to default values:
case R.id.resetButtonID:
            textParamA.setText("1");
            textParamA.setError(null);
            textParamB.setText("1");
            // etc...
.gitignore in Android Studio
Add these to .gitignore:
*.iml
.gradle
local.properties
.idea/workspace.xml
.idea/libraries
.idea
.DS_Store
build
captures
.externalNativeBuild
SDK Location Not Found when building
As seen on Stackoverflow here
If you build your project and it shows the error
SDK Location Not Found
Use the icon to Sync Project with Gradle Files
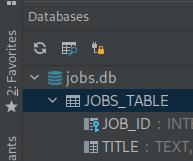
Keep database connection open.
As shown in the Android docs here
Debug database connections using this icon. The default is a blue lock. To keep database connections open click on the icon and it changes to a yellow lock.
Vibrate after clicking something
This response in Stackoverflow here shows how to set this up.
Import the class
import android.os.Vibrator;
On the click method after capturing the ID on the button clicked.
Vibrator vibe = (Vibrator) getSystemService(Context.VIBRATOR_SERVICE);
vibe.vibrate(100);
In the AndroidManifest.xml add this:
<uses-permission android:name="android.permission.VIBRATE" />
Troubleshooting an app
If the build runs and the app opens.
On the lower bar menu option Run see the output as you interact with the app.